2. Setting up Legacy ESXI Server on HYPER-V - An Experiment
Deep Dive into VMware services: A Blog Series

Prerequisites:
This blog is intended for readers who have basic understanding of Virtualization, Hypervisors, VMware tools & technologies.
This article explores setting up VMware ESXi with nested virtualization on Hyper-V, focusing on configuring ESXi for multiple hypervisor environments. It details prerequisites, hardware verification, enabling BIOS virtualization, and troubleshooting compatibility issues. The use of ESXi-Customizer-PS for ESXi 6.x and 7.x is discussed, along with configuring PowerCLI and updating Python packages. The goal was to gain hands-on experience, even if the desired outcome wasn't fully achieved, providing valuable exposure. This legacy method is being replaced by the "PowerCLI method" for generating custom ISO for ESXi 8 which will be also explored later on.
INTRODUCTION
VMware has consistently advanced its virtualization technology to its highest potential. It is known for scaling effectively in terms of cost and efficiency by offering various services that meet industry requirements and needs in the field of infrastructure. VMware services such as
VMware vSphere
VMware Cloud Director
vRealize Operations Manager
vSAN, VMware NSX-T
VMware Cloud Services
VMware Cloud on AWS
VMware HCX
VMware Site Recovery Manager
vSphere Replication
VMware Cloud Foundation
VMware Horizon environments.
MY PLAN
I wanted to gain hands-on experience with ESXi, including configuring and managing multiple ESXi instances using the vSphere Client UI. This is where the vCenter service becomes essential, especially with the use of Nested Virtualization Technology.
What is Nested Virtualization Technology?
Nested Virtualization Technology refers to the capability of running a virtual machine (VM) inside another VM. This technology allows you to create a virtualized environment within an already virtualized system. It is particularly useful for testing and development purposes, as it enables the creation of complex virtual environments without the need for additional physical hardware. Nested virtualization is often used to run hypervisors like VMware ESXi or Microsoft Hyper-V inside a virtual machine, allowing for the management and operation of additional VMs within that nested environment.
Ways to ENABLE Nested Virtualization in our system
- VERIFICATION:
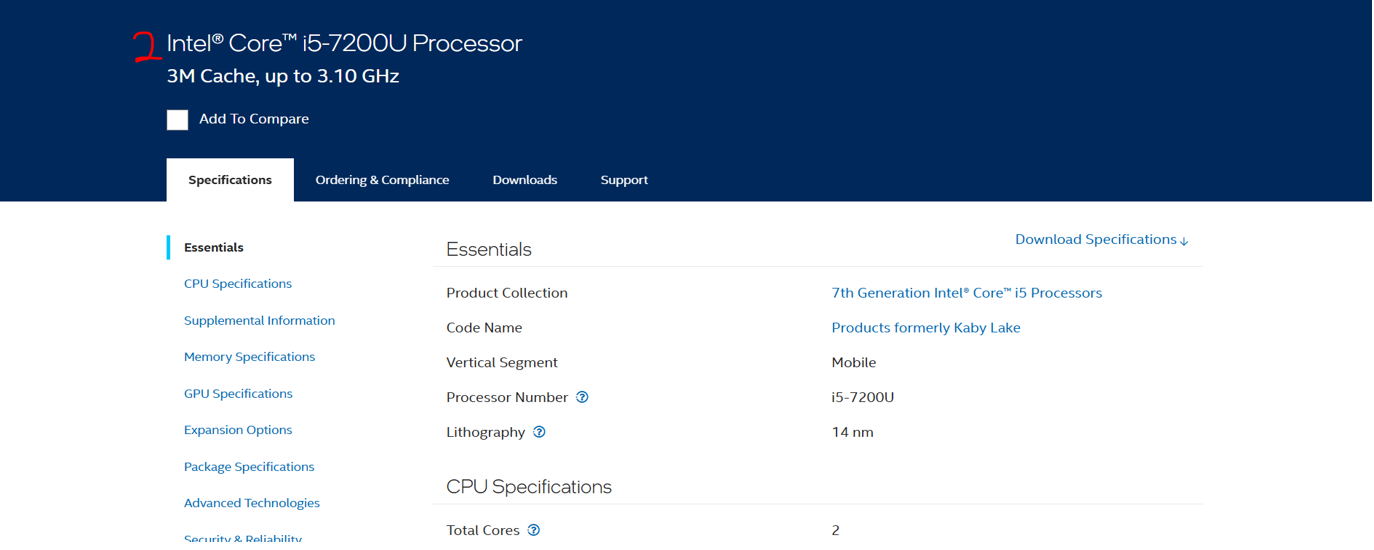
Make sure to first know your CPU Hardware configuration/Processor Type and search in the Processor brand site (E.g., Intel).
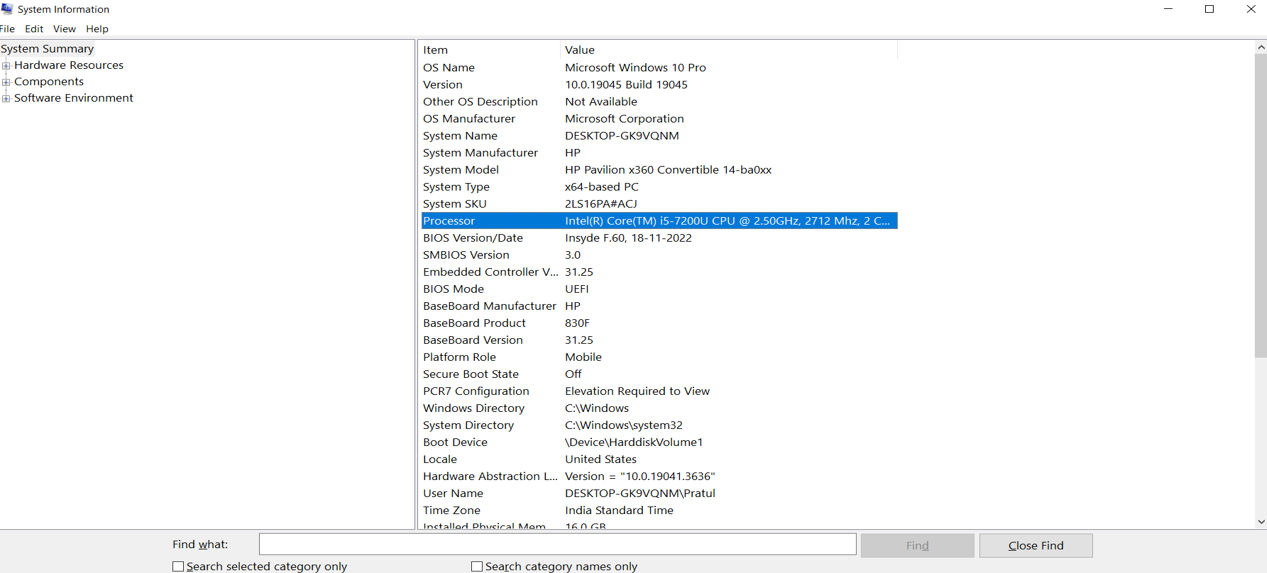
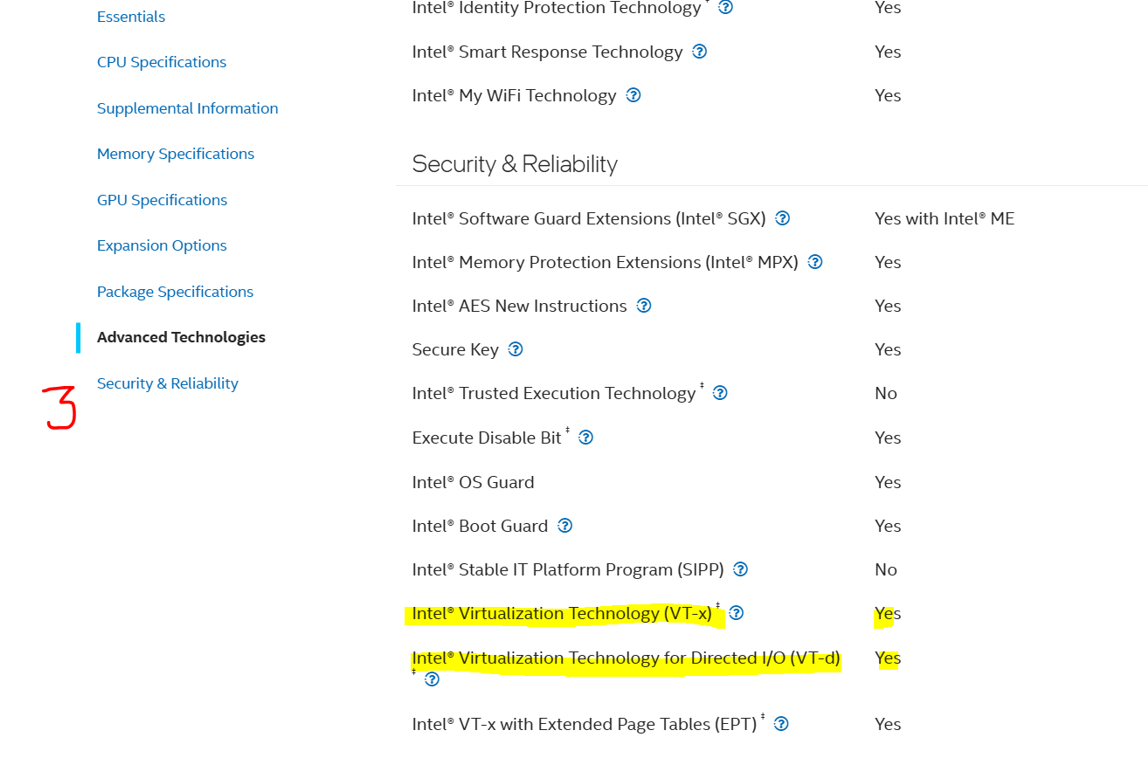
Under security and reliability, you will see whether your CPU supports intel-VT or not.
As you can see my processor supports hardware-based virtualisation. Which means I am good to go and I should be able to run the virtual machine with no issue, and I could even use it as nested virtualization as well.
So, if you have verified the above steps and you have hardware-based virtualisation on your processor,
Once PROCESSOR supports for Virtualization Technology, check that this feature is enabled on the processor of host/Personal PC.
Right-click the Taskbar → choose Task Manager.
Go to Performance tab → select CPU.
On the right side, look for Virtualization:
✅ If it says Enabled, then VT-x (Intel) or AMD-V is active.
❌ If it says Disabled, you need to enable it in BIOS/UEFI.
systeminfo
Scroll down to the section Hyper-V Requirements:
If it says:
VM Monitor Mode Extensions: Yes
* Virtualization Enabled In Firmware: Yes
* Second Level Address Translation (SLAT): Yes
* Data Execution Prevention Available: Yes
Then your CPU supports Intel VT-x/EPT or AMD-V/RVI and it’s enabled.
Get-ComputerInfo | Select-Object HyperVRequirement*
Look for:
HyperVRequirementDataExecutionPreventionAvailable
HyperVRequirementSecondLevelAddressTranslation (this corresponds to EPT/RVI)
HyperVRequirementVMMonitorModeExtensions
HyperVRequirementVirtualizationFirmwareEnabled
If all show True, you’re good to go.
- SETUP:
There are chances that your PROCESSOR support for Virtualization Technology, but it’s not been ENABLED by default in some system.
To enable hardware virtualization, follow these steps:
Restart your laptop and enter the BIOS or UEFI settings (usually by pressing Delete, F2, F10, or another specific key during start up).
Look for options labelled in respective PROCESSORS’ vendor,
INTEL: “Intel VT-x” (OR) “Intel Virtualization Technology” (OR) “Virtualization”.
AMD: “AMD-V” (OR) “SVM Mode”.
Enable the option, Save the changes, and restart your laptop.
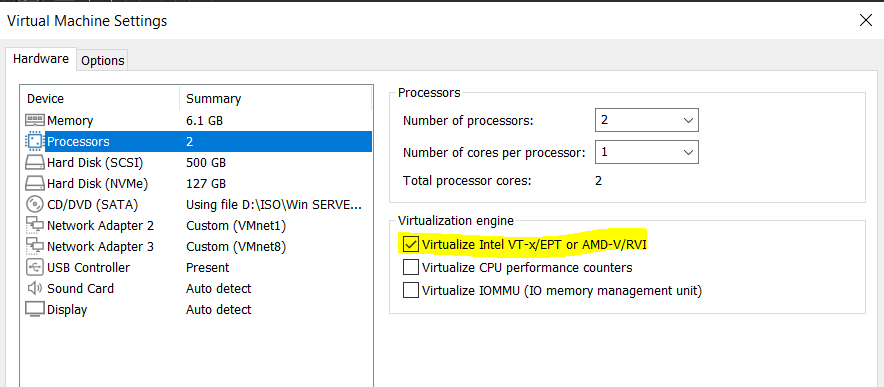
After enabling virtualization in the BIOS, Restart VMware Workstation and ensure that the “Virtualize Intel VT-x/EPT or AMD-V/RVI” option is enabled for your ESXi VM.
This setup will allow ESXi to utilize the hardware virtualization feature, improving performance and enabling nested virtualization.
If you don’t see the option:
- Some BIOS versions might hide this setting or may not provide direct access. In such cases, check if your BIOS is up to date by comparing your current version (F.60) with the latest version available on HP’s support website for your model.
Now, I will be sharing my overall step by step approaches in this blog series- VMware Area, for setting up ESXi on different platforms. Here are the highlights:
VMware ESXi on VMware Workstation Pro 17 (Type-2): Direct Install.
VMware ESXi on Microsoft HYPER-V (Type-2): Direct Install.
VMware ESXi on Microsoft HYPER-V (Type-2): Using PowerShell Customizer Tool (Works only for ESXi versions 6, 6.5 & 7).
VMware ESXi on Microsoft HYPER-V (Type-2): Using PowerCLI Tool (Works only for ESXi versions 8 & above).
NOTE: The activities I will be showcasing are all as an experiment. There are chances that I may succeed or not. But end result it will give me an experience on overall idea of VMware’s services compatibility & support on other platforms.
VMware ESXi on Microsoft HYPER-V
Physical Machine (Windows 10/11 with Intel VT-x)
└── Hyper-V Host
└── ESXi 8.0 VM (nested)
└── VCSA Server (vCenter Appliance)
└── vSphere Client (web-based access)
Understanding HYPER-V
It's important to clearly understand what Hyper-V is, when to use it, and how it differs from other hypervisors like VMware Workstation Pro and Oracle VirtualBox.
Since Hyper-V is a TYPE-1 (bare-metal) hypervisor, it can be set up on physical servers using Windows Server OS or on personal PCs with Windows 10/11.
Here’s why 👇
When you enable Hyper-V, Windows is no longer the “host OS.”
The Hyper-V hypervisor sits directly on the hardware (bare-metal).
Your “Windows desktop” then runs as a special virtual machine called the Parent Partition (root VM).
So technically, your host Windows OS becomes a VM running on top of the Type-1 hypervisor.
This is why other hypervisors like VMware Workstation or VirtualBox can't run at the same time (they need direct hardware access).
Hyper-V is the only hypervisor from Microsoft that works on both personal PCs and in data centers. This is different from VMware and Citrix, which rely on various services, whether they are Type-1 or Type-2.
The only thing that differs in HYPER-V is the environment & usage:
| Feature | Hyper-V on Personal PC (Client Hyper-V) | Hyper-V on Server (Datacenter / Windows Server Hyper-V) |
| OS Edition | Windows 10/11 Pro, Enterprise | Windows Server (2016, 2019, 2022, etc.) |
| Purpose | Developer, testing, small labs | Production virtualization, data centers |
| Management Tool | Hyper-V Manager, PowerShell | Hyper-V Manager, PowerShell, SCVMM (System Center Virtual Machine Manager), Azure Arc, etc. |
| Features | Limited (no live migration, clustering) | Full (Failover Clustering, Live Migration, Replica, SR-IOV, etc.) |
| Licensing / Performance | Desktop-optimized | Data-center optimized (with resource isolation, NUMA, etc.) |
So:
🔹 Same hypervisor core (the same “micro-kernelized” virtualization layer).
🔹 Different feature set and scalability.
Q. Why do HYPER-V feel more like Type-2 when hosted in our Windows 10/11 PCs, but its NOT!?
Because of how it looks — you “install” it inside Windows, not before installing Windows.
But behind the scenes, once Hyper-V is active, the boot loader changes:
Boot sequence
Firmware (UEFI/BIOS)
↓
Hyper-V Hypervisor (bare metal)
↓
Parent Partition (Windows OS)
↓
Child Partitions (Virtual Machines)
That’s Type-1 architecture.
| Analogy | Type-1 | Type-2 |
| Runs directly on hardware? | ✅ Yes | ❌ No |
| Example | Hyper-V, VMware ESXi, XenServer | VMware Workstation, VirtualBox |
| Who controls the hardware? | Hypervisor | Host OS |
| Performance | Higher | Lower |
💡 Summary
🔸 Hyper-V (desktop or server) → Same Type-1 hypervisor
🔸 Client Hyper-V (Windows 10/11) = Lightweight, feature-limited version
🔸 Server Hyper-V = Enterprise-grade version with advanced management tools
🔸 Your “Windows host” becomes a root VM when Hyper-V is active
CAUTION:
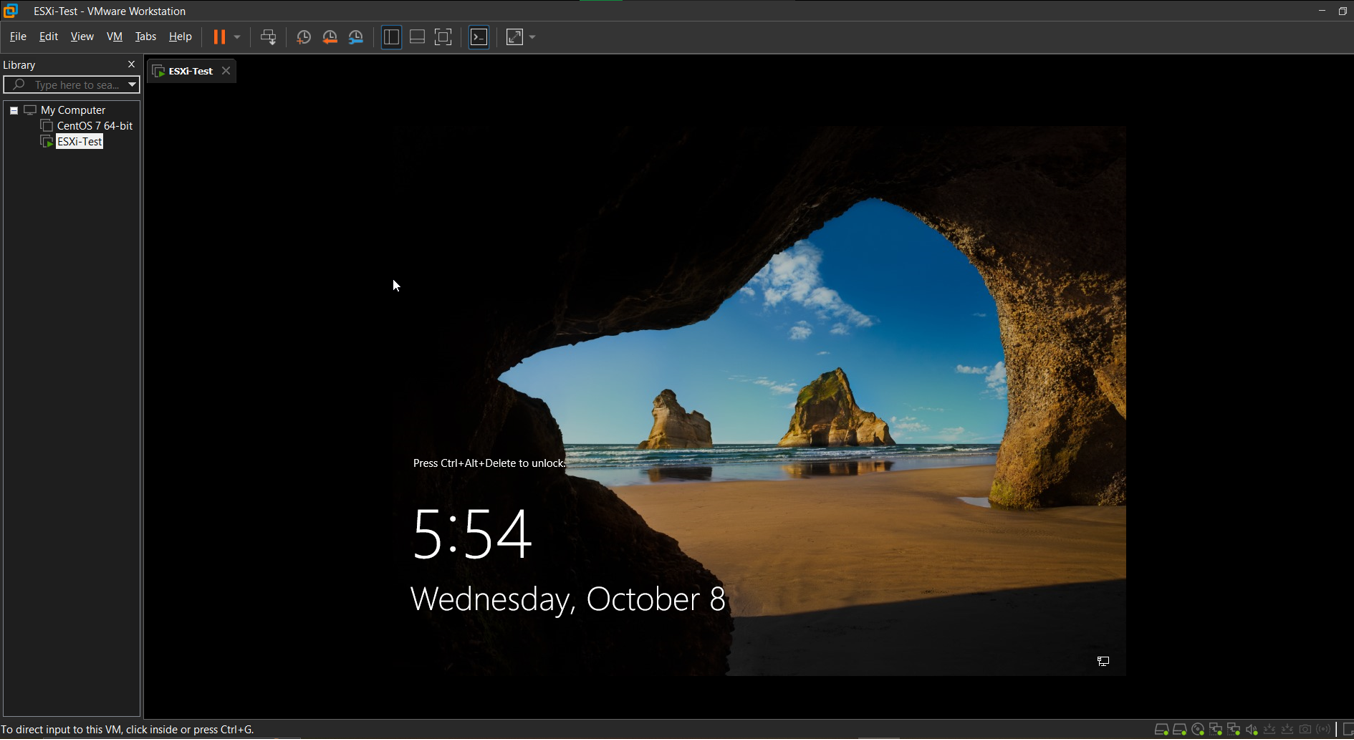
To avoid PC getting corrupted by following above procedure, I first tried it out in a compatible VM like Windows 10/11 platform with most importantly Nested Virtualization enabled (Intel VT-x/AMD-V). Without this Hyper-V won’t work as explained above.
I hosted a VM in VMware Workstation & performed my activity,
CHALLENGES: Using Concurrent TYPE 2 Hypervisors
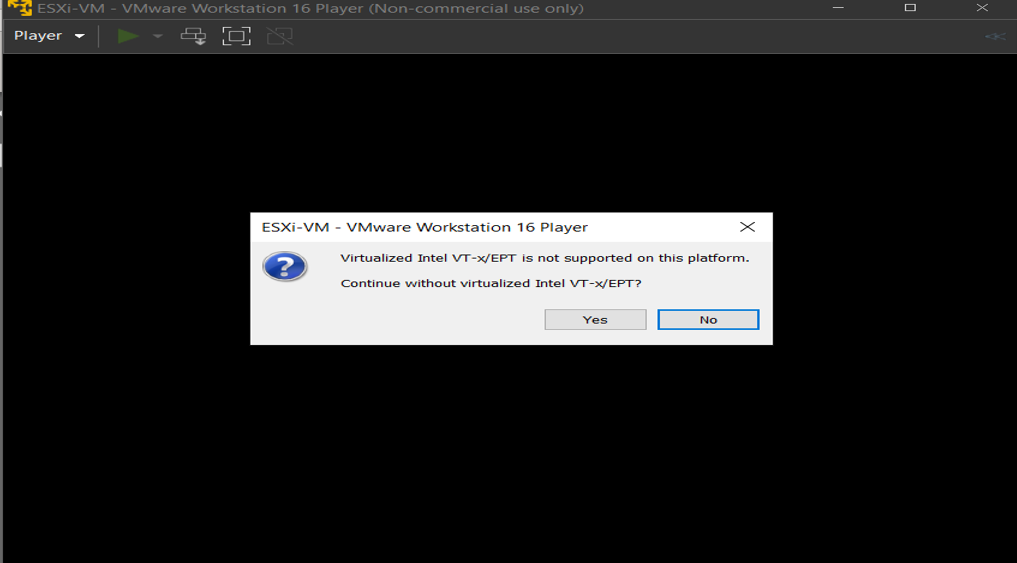
Since HYPER-V is already setup in my PC, Nested Virtualization (Intel VT-x/AMD-V) is not possible, even though it’s enabled on VM & OS settings level as well. Throwing me below msg:
# DIAGNOSE
Many third-party virtualization applications don't work together with Hyper-V. Affected applications include VMware Workstation and VirtualBox. These applications might not start virtual machines, or they may fall back to a slower, emulated mode.
These symptoms are introduced when the Hyper-V Hypervisor is running. Some security solutions are also dependent on the hypervisor, such as:
Device Guard
Credential Guard
Applies to: Windows 10 - all editions
Original KB number: 3204980
For More Refer,
Therefore, Running ESXi(s) on Hyper-V is generally not officially supported, but certain versions and configurations may work. Compatibility can vary significantly, and it often depends on specific tweaks and settings.
# TROUBLESHOOT
If you want to run nested VMs: You should enable hardware virtualization in the BIOS. Without it, ESXi won't be able to support nested virtualization, meaning you cannot run VMs inside ESXi effectively.
NOTE: If you don't plan to run nested VMs within ESXi: You can proceed, but ESXi may have limited functionality and may run slower, as it relies on hardware virtualization for efficient operation.
Step-1: Verify hardware virtualization is ENABLED in BIOS
Refer to above steps to verify & enable hardware virtualization.
Step-2: Uninstall HYPER-V (Only done if Hyper-V is not needed)
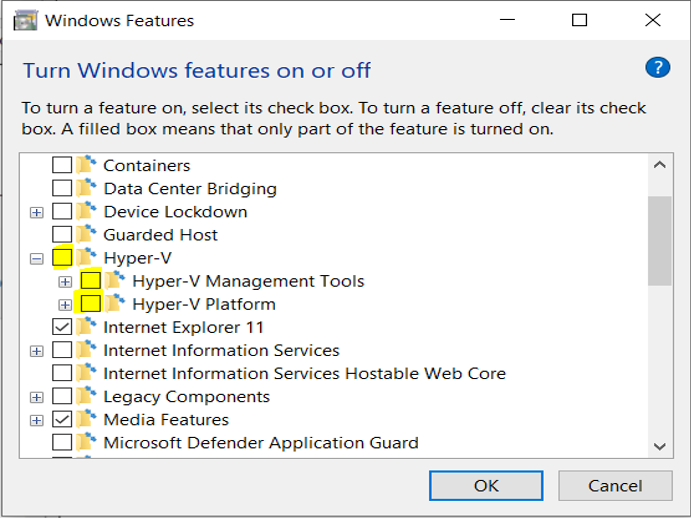
After enabling virtualization, try running your ESXi VM again in VMware Workstation. If this doesn’t work, check Windows features to ensure Hyper-V is disabled, as it may conflict with VMware Workstation’s access to virtualization.
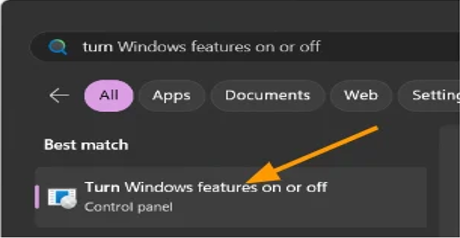
Click on Start -> type turn windows features on or off and click on the turn windows features on or off item in control panel.
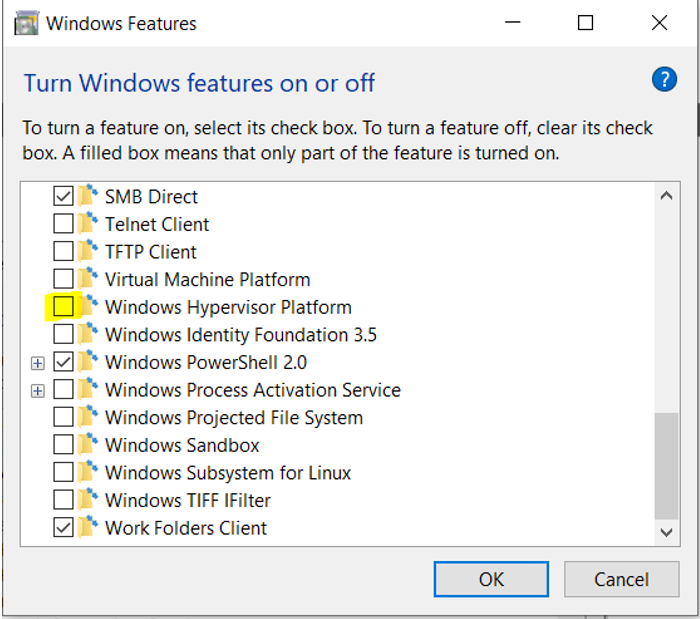
Disable the below “Hyper-V options” & “Windows Hypervisor Platform” as highlighted below:
(FOR SECURITY CONCERNS)
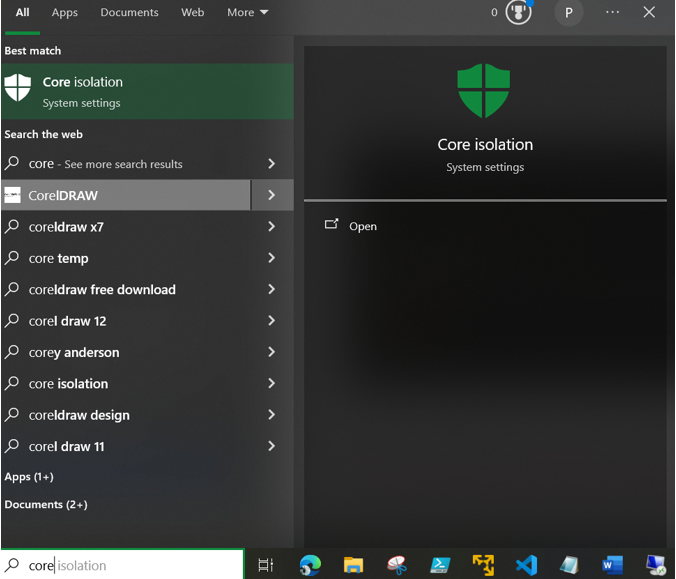
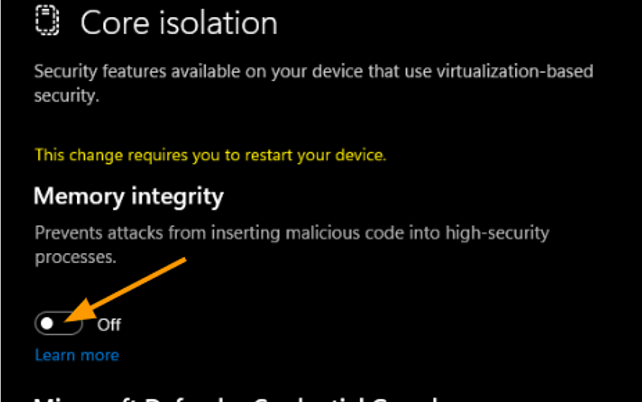
NOTE: Make sure before restarting disable “Core Isolation” – Memory Integrity option as well.
(Type “Core Isolation” in Search)
(My Requirement)
However, "Step-2" is not feasible for me because I already have VMs set up with an ADDS Forest, and they are running critical services needed for my work (Refer to my INTUNE blog for details).
Step-3: Toggle technique among two Hypervisors (HYPER-V & VMware Workstation):
Toggle the Windows boot setting so the hypervisor doesn’t launch, then reboot:
# run as Administrator in CMD/PowerShell
bcdedit /set hypervisorlaunchtype off

Restart-Computer
# To re-enable Hyper-V later:
bcdedit /set hypervisorlaunchtype auto

Restart-Computer
Optional: If Workstation still complains, disable Hyper-V related Windows features (Turn Windows features on/off or use DISM) and turn off Device Guard / Credential Guard / Memory Integrity (Windows Security → Device security → Core isolation → Memory integrity). Some systems require both the bcdedit change and disabling VBS to allow full nested virtualization.

Once successfully Hyper-V VMM service is toggled as per above PowerShell command. The VM hosted in VMware Workstation no longer gave the above error & worked perfectly!
After all this, I installed HYPER-V role in Windows Server 2019 (working under the principle of Nested Virtualization).
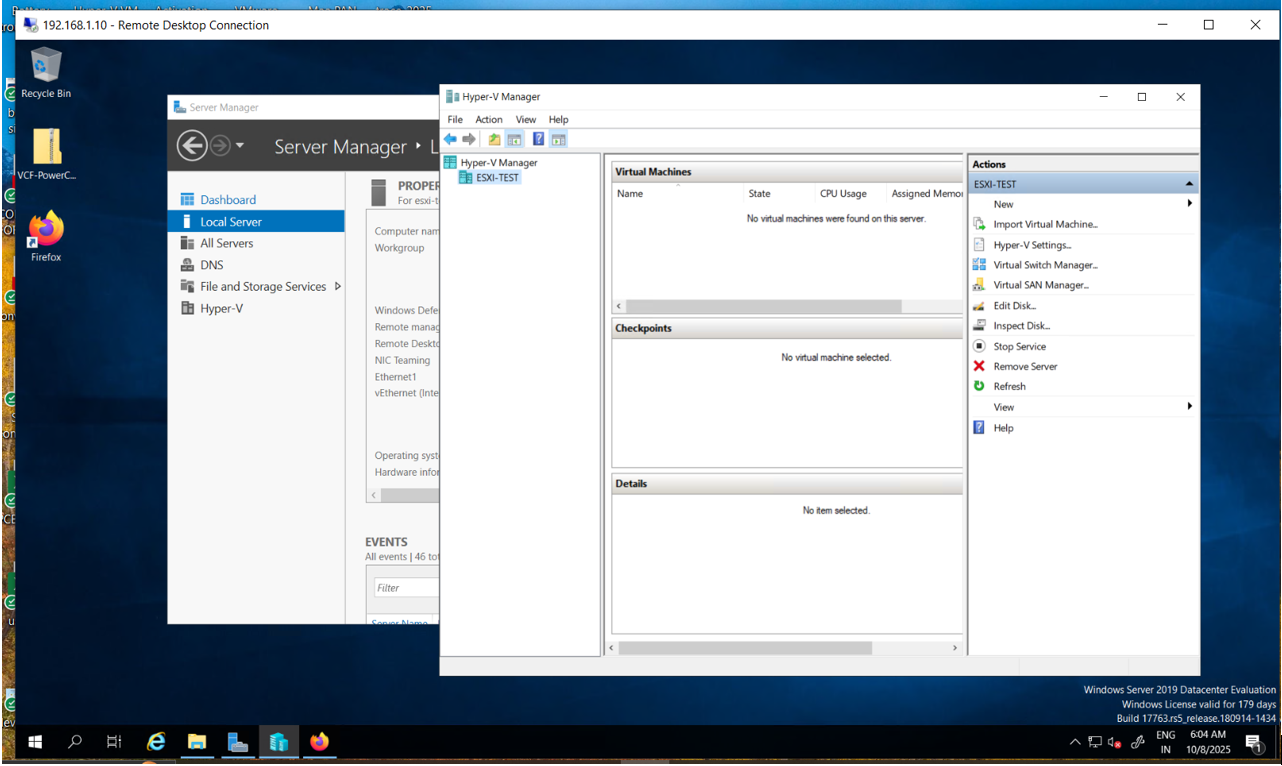
Moving on as per my desired result, I created a VM in HYPER-V (at Windows Server 2019 hosted over VM at VMware Workstation in my Host PC). But on mounting ESXi ISO directly to the VM, it didn’t support. This is where I relied on doing diggings using various other blogs & some bit of help from OpenAI.
Therefore, I looked for techniques of achieving compatible .ISO files of ESXi(s) 6.X/7.X OSes, that can perfectly fit in my Hyper-V.
It turns out setting up ESXi in Hyper-V requires various prerequisites:
The following requirements must be met in order to install ESXi on a Hyper-V VM:
Compatible hardware. Your processor must support hardware virtualization features. In case of using Hyper-V, you must have the Intel CPU (central processing unit) with Intel VT-x (Virtualization Technology) support. Intel VT-x must be enabled in BIOS or UEFI (Unified Extensible Firmware Interface) of your computer.
Windows 10 (Build 10565 or later) or Windows Server 2016 with Hyper-V. Hyper-V VM configuration version must be 8.0 or later.
PowerCLI 6.3 or later. PowerCLI is a tool with a command line interface (CLI) provided by VMware, which includes a set of cmdlets that can be executed in PowerShell as well as used for scripting and automation.
ESXi installation image. The installation image must be ESXi-6.0.0-20170604001 Build 5572656 or older. Newer builds and versions of ESXi may not work due to blocking network drivers for a Hyper-V legacy virtual network adapter. Download the appropriate offline bundle in a ZIP archive. ESXi600-201706001.zip is used in this blog post.
Setting up manually can get tedious, therefore I relied on using a free ESXi-Customizer script.
Using ESXi-Customizer-PS script (Only supports VMware ESXi 6.X/7.X OS images)
The ESXi-Customizer-PS script is a PowerShell script that greatly simplifies and automates the use of the VMware PowerCLI Image Builder module, facilitating the quick customization of VMware ESXi 6.X/7.X OS images.
Environment requirements:
Windows 10 OS (with built-in PowerShell)
VMware PowerCLI 5.1 or later.
Command:
.\ESXi-Customizer-PS-v2.5.1.ps1 -v60 -vft -load net-tulip
The .\ means “run a file in the current directory.”
ESXi-Customizer-PS-v2.5.1.ps1 is a PowerShell script created by Andreas Peetz.
This tool automates the process of creating a customized ESXi installation ISO (by integrating drivers or offline bundles).
💡 So this is the main script being executed.
🧠 2. -v60
This tells the script which ESXi version to work with.
-v60 means ESXi 6.0.
The script will automatically download the ESXi 6.0 offline bundle from VMware’s depot or use your local one.
✅ Example:
If you used -v70, it would target ESXi 7.0 instead.
🧠 3. -vft
This switch tells the tool to connect to the V-Front Online Depot, which hosts community-created or unsupported drivers.
The V-Front depot is a repository where VMware enthusiasts share custom drivers and ESXi software packages.
🔸 In short:
“Use community driver sources in addition to official VMware sources.”
🧠 4. -load net-tulip
-load adds specific driver packages (called VIBs) into your custom ISO.
net-tulip is the name of a network driver — usually used for old or unsupported NICs (like DEC/Intel 21140) that aren’t natively supported by ESXi.
✅ This option injects the net-tulip driver into the ESXi ISO, ensuring the installer detects your NIC during installation.
⚙️ Putting It All Together
The command:
./ESXi-Customizer-PS-v2.5.1.ps1 -v60 -vft -load net-tulip
Does the following:
Runs the ESXi-Customizer PowerShell script.
Targets VMware ESXi 6.0 version (-v60).
Uses the V-Front depot for community drivers (-vft).
Injects the net-tulip network driver into the ISO (-load net-tulip).
Produces a custom ESXi 6.0 ISO file that supports that NIC.
📦 Result
After running successfully, you’ll get something like:
Output ->
ESXi-6.0.0-Custom.iso
in the same folder — ready to be used for installation on hardware that needs the custom driver.
I want to run ESXI 8 on HYPER-V. Can it achieve through ESXi-Customizer-PS script or is there any alternate way to achieve this?
The Answer is NO.
Reason:
It’s outdated and built for legacy offline depots (ESXi ≤6.x).
ESXi 8 uses new VIB/Image profile structure that the script doesn’t recognize.
If you try to use it, it’ll fail to build or will generate a corrupted ISO.
Alternative:
✅ Instead, use official VMware PowerCLI Image Builder to make a compatible ESXi 8 ISO (for HYPER-V or even works for VirtualBox), usually don’t need to customize the ISO at all unless:
Virtual NIC (Synthetic NIC) isn’t detected by ESXi installer.
Need to inject drivers for Hyper-V’s virtual hardware (which ESXi doesn’t natively support).
NOTE: I will soon perform customization of ESXi 8 versions using VMware PowerCLI Image Builder in the upcoming blogs where I will be mentioning steps as detailed as possible with challenges & desired outcomes.
For now I stick with achieving .ISO file of VMware ESXi 6.X/7.X OSes for my practical experiments.
I downloaded the script from trusted source, also referring to the steps to achieve this.
At first, I thought it was straightforward, but I encountered several hurdles. I'll show you snippets with brief descriptions below. The explanations might become repetitive, and they are mainly useful for those who are also setting up this lab on their end. The following procedure includes a series of errors and their respective solutions.
→ Step 1: Install Python 3.11
Download the Python 3.11 installer for Windows from the official Python website: https://www.python.org/downloads/release/python-3110/.
Run the installer. During the installation, check the box for Add python.exe to PATH to simplify later steps.
Restart your computer to ensure the PATH variable is properly updated.
→ Step 2: Install VMware PowerCLI
Launch PowerShell as an Administrator. You can do this by right-clicking the Start Menu and selecting Windows PowerShell (Admin) or Terminal (Admin).
Allow script execution by running this command:
Set-ExecutionPolicy -ExecutionPolicy RemoteSigned -Scope CurrentUser
Note: Use code with caution.
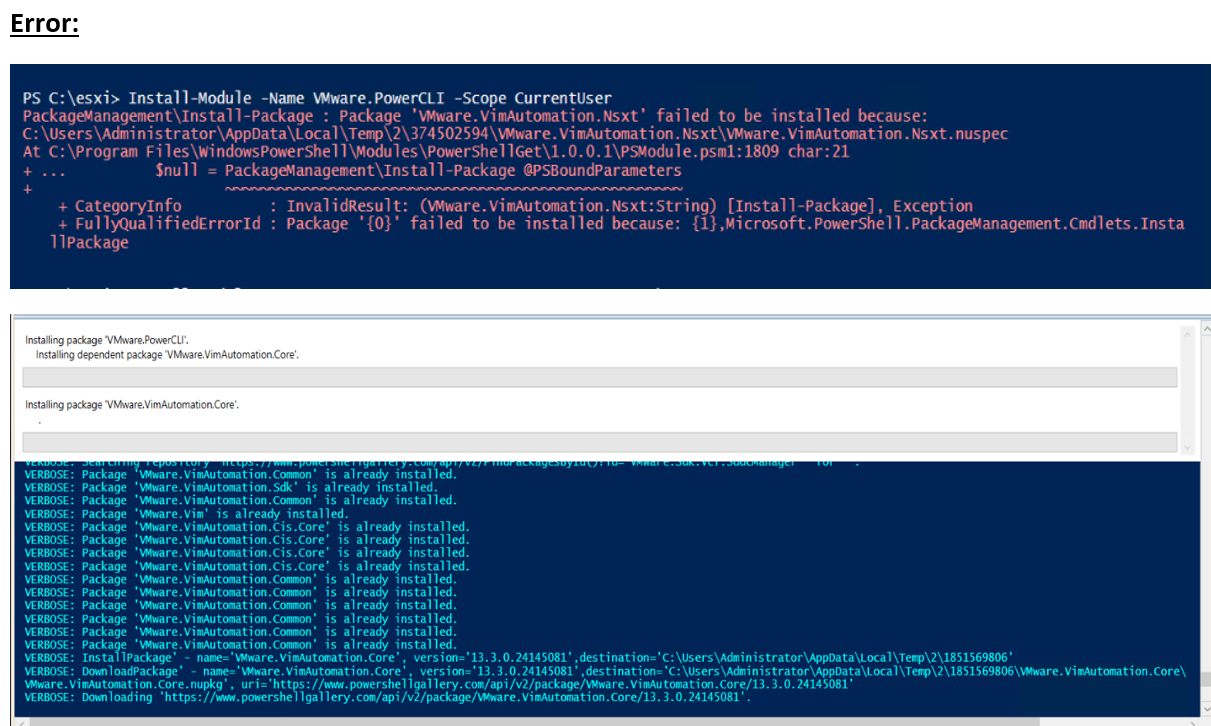
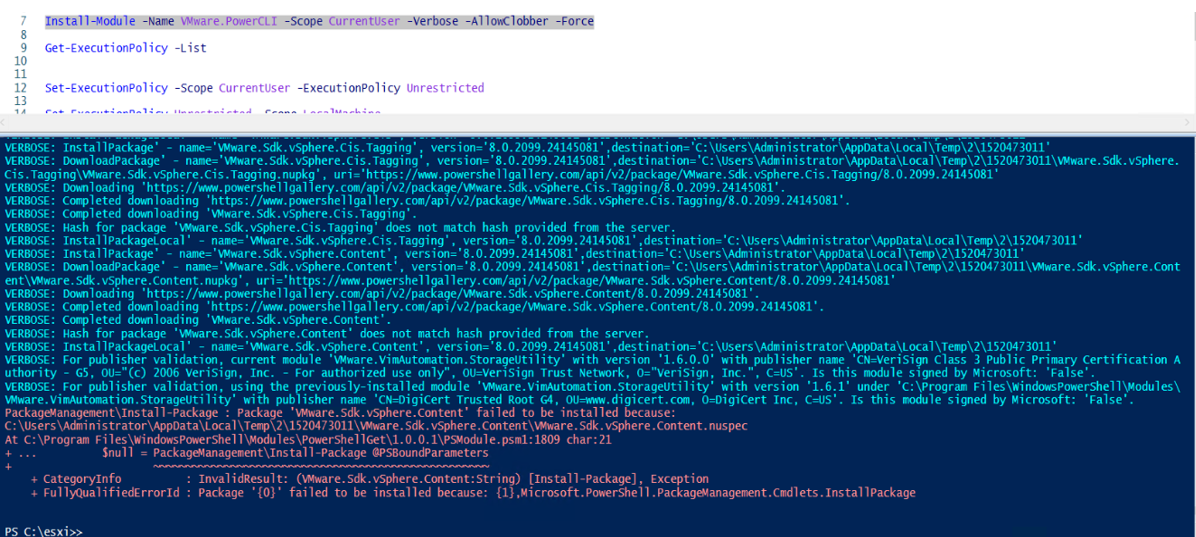
Install the VMware PowerCLI module from the PowerShell Gallery. This command will also handle the necessary dependencies.
Install-Module -Name VMware.PowerCLI
Note: Use code with caution.
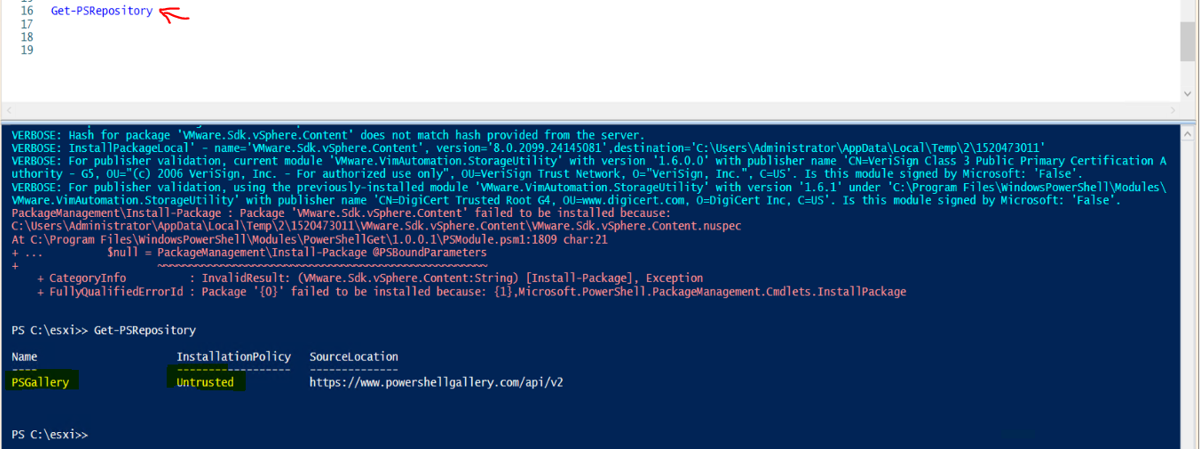
If prompted about an untrusted repository, type Y and press Enter to proceed.
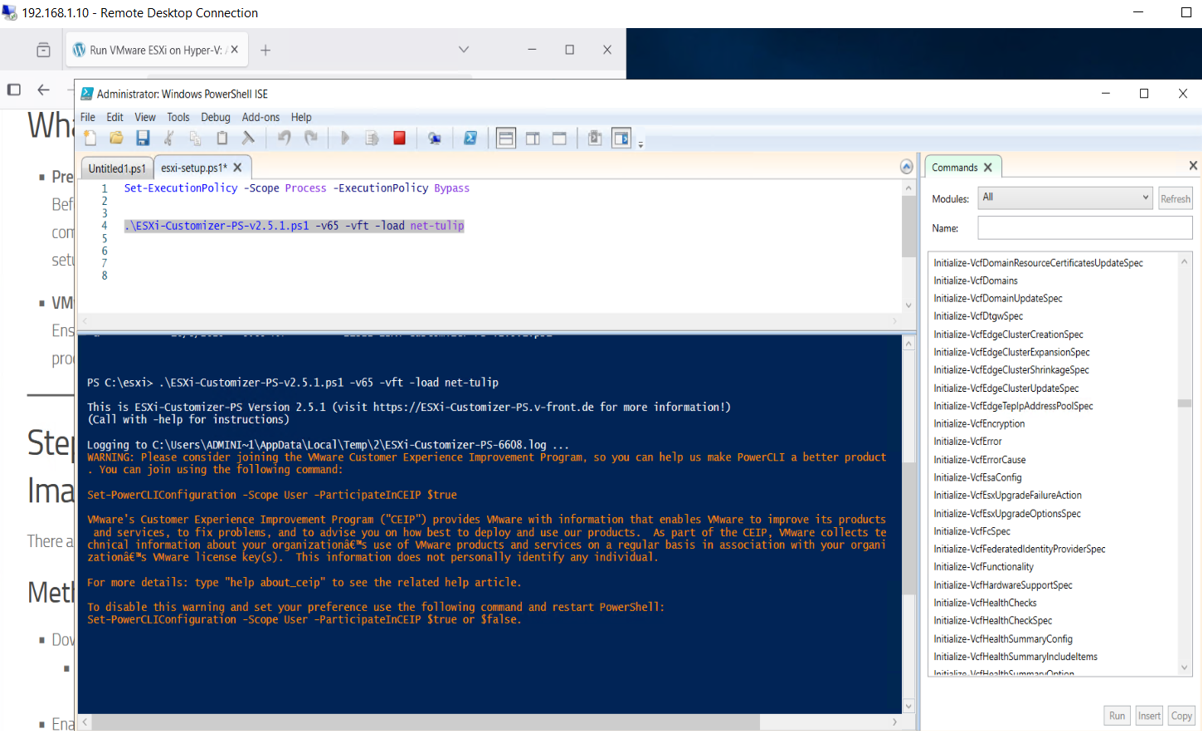
Diagnose:
FIX:
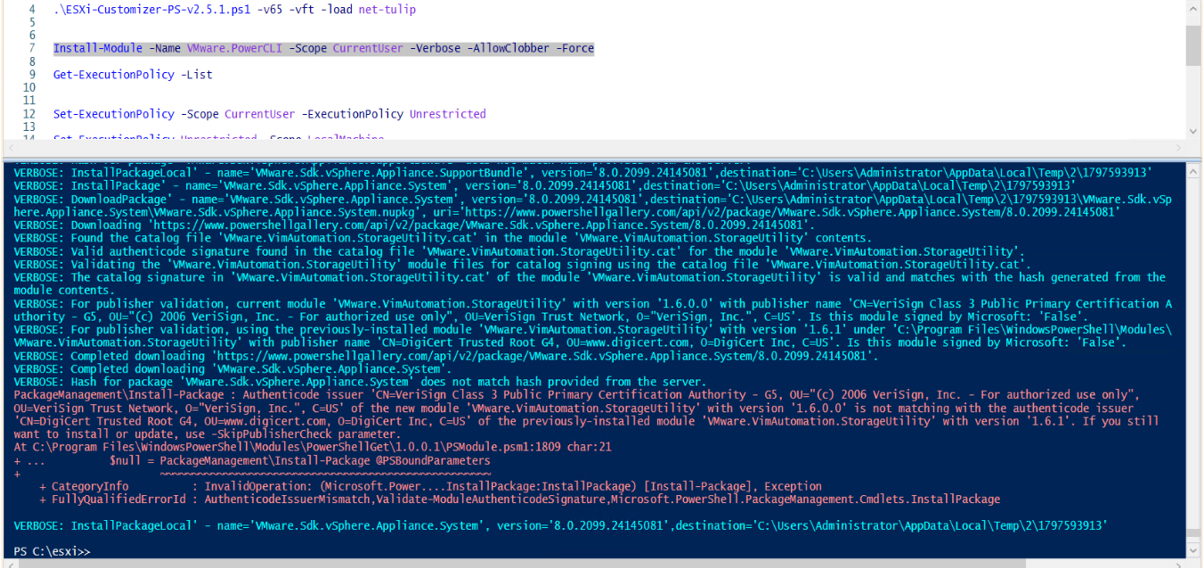
Install-Module -Name VMware.PowerCLI -Scope CurrentUser -AllowClobber -Force -SkipPublisherCheck
Error:
While running command (after Completely downloading & installing PowerCLI):
./ESXi-Customizer-PS-v2.5.1.ps1-v65-vft-loadnet-tulip
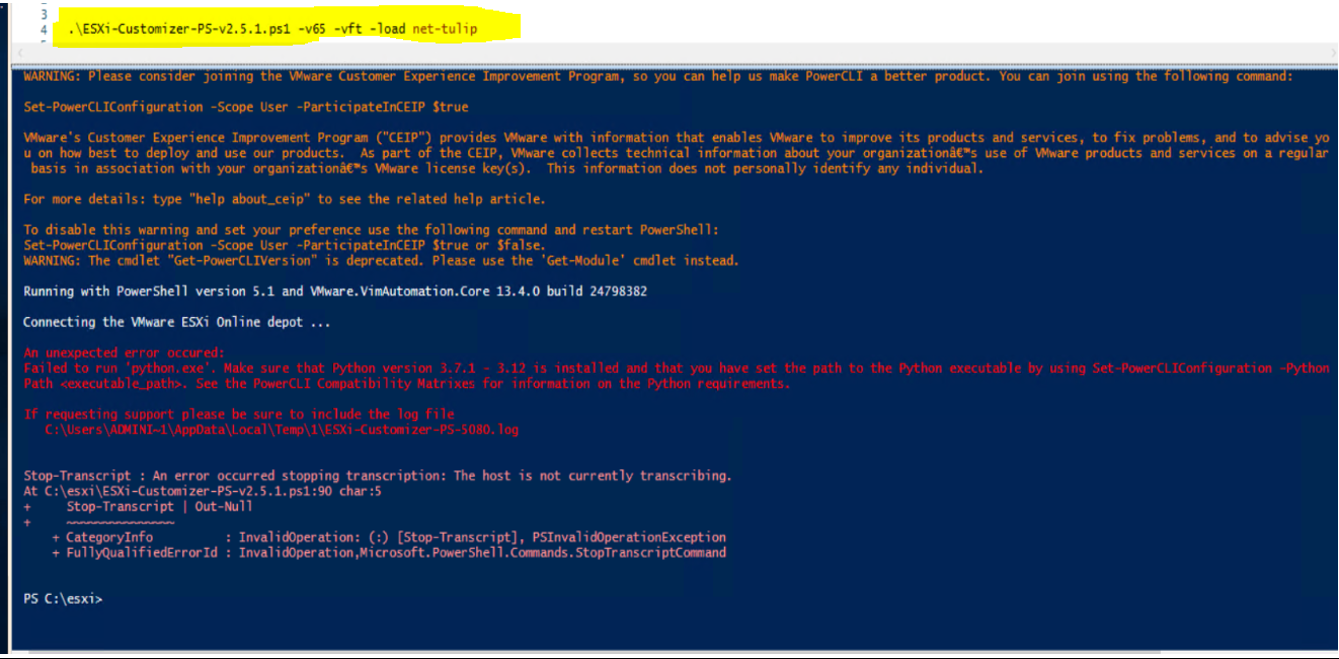
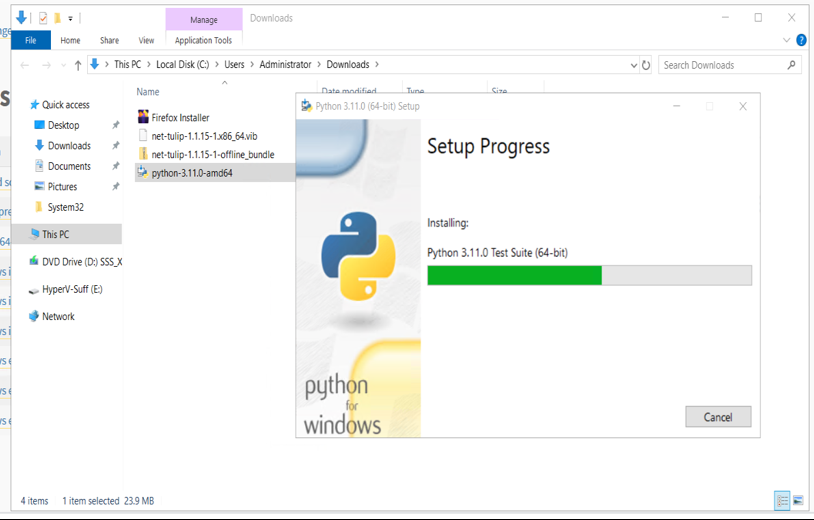
FIX:
- Python 3.11 Installation→
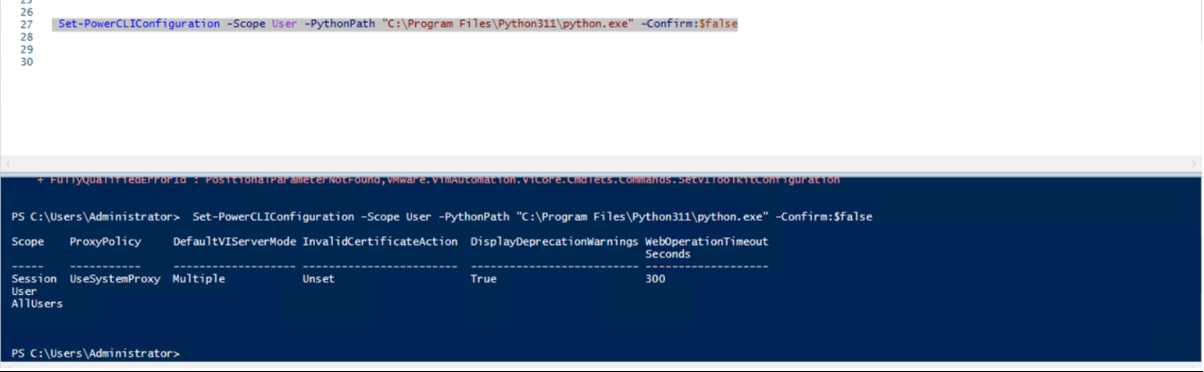
→ Step 3: Configure PowerCLI to use Python
PowerCLI requires you to explicitly set the path to your Python installation for its ImageBuilder module to function correctly.
In your Administrator PowerShell window, run the following command. The -PythonPath argument assumes you used the default installation directory.
Set-PowerCLIConfiguration -PythonPath "C:\Users\$env:UserName\AppData\Local\Programs\Python\Python311\python.exe" -Scope User
You may need to adjust the path if you installed Python to a different location.
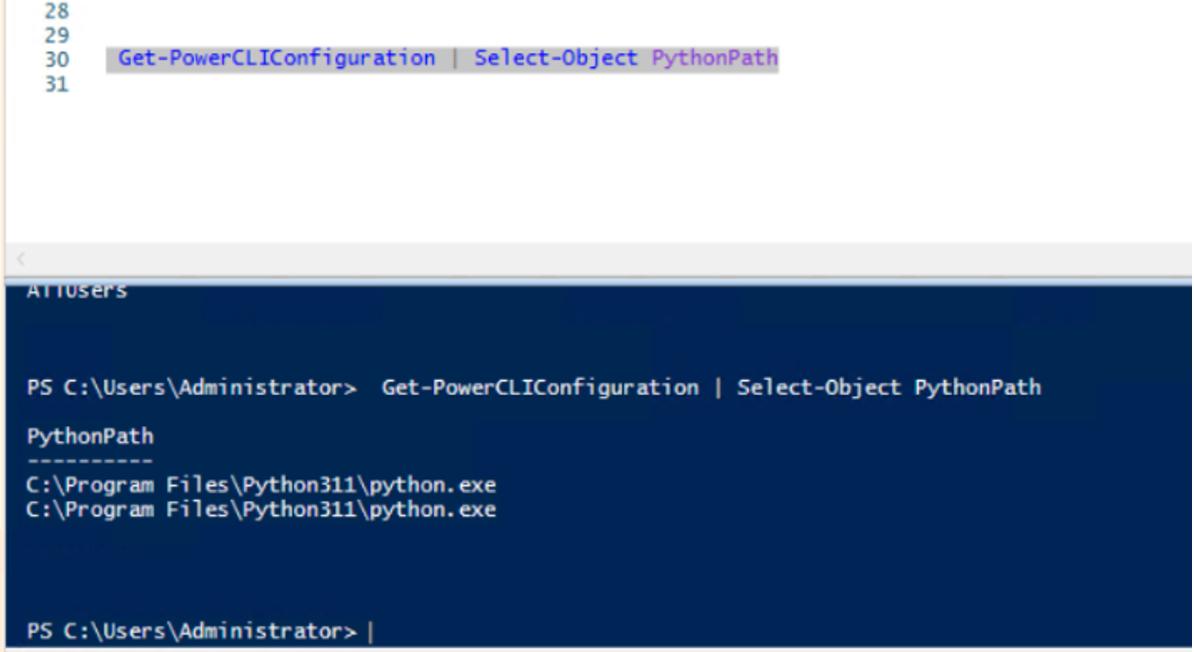
#To Check PYTHON Version#
python --version

Set-PowerCLIConfiguration -Scope User -PythonPath "C:\Program Files\Python311\python.exe" -Confirm:$false
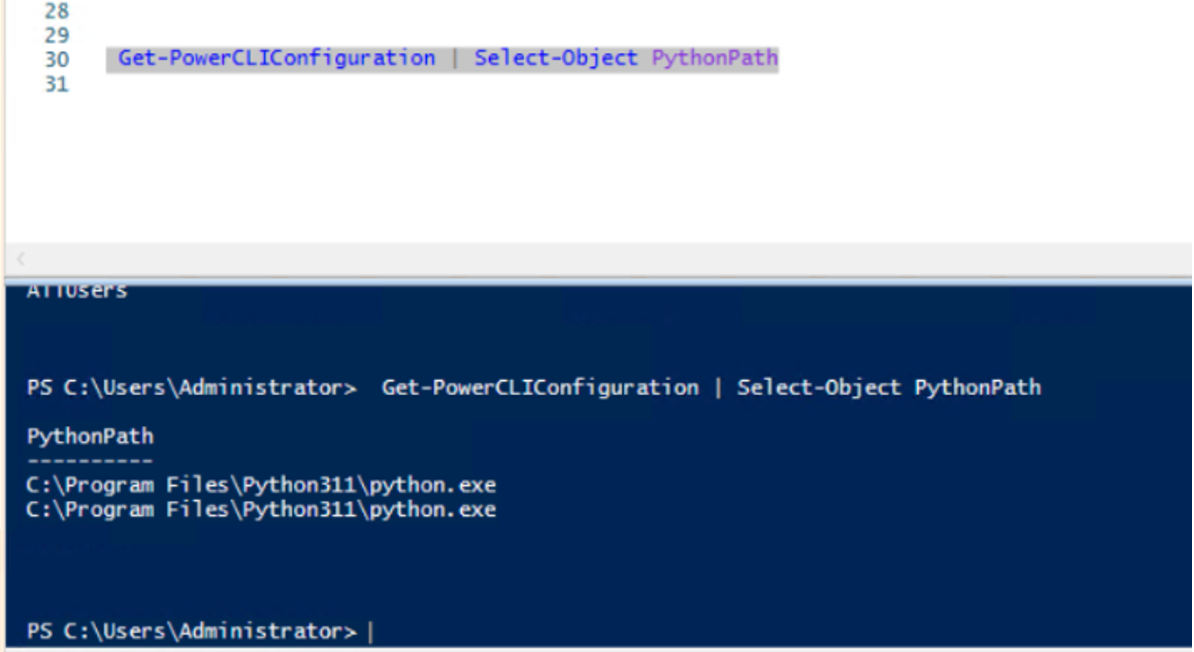
#To Check PYTHON Installed Directory#
Get-PowerCLIConfiguration | Select-Object PythonPath
Error:
On running,
.\ESXi-Customizer-PS-v2.5.1.ps1 -v65 -vft -load net-tulip
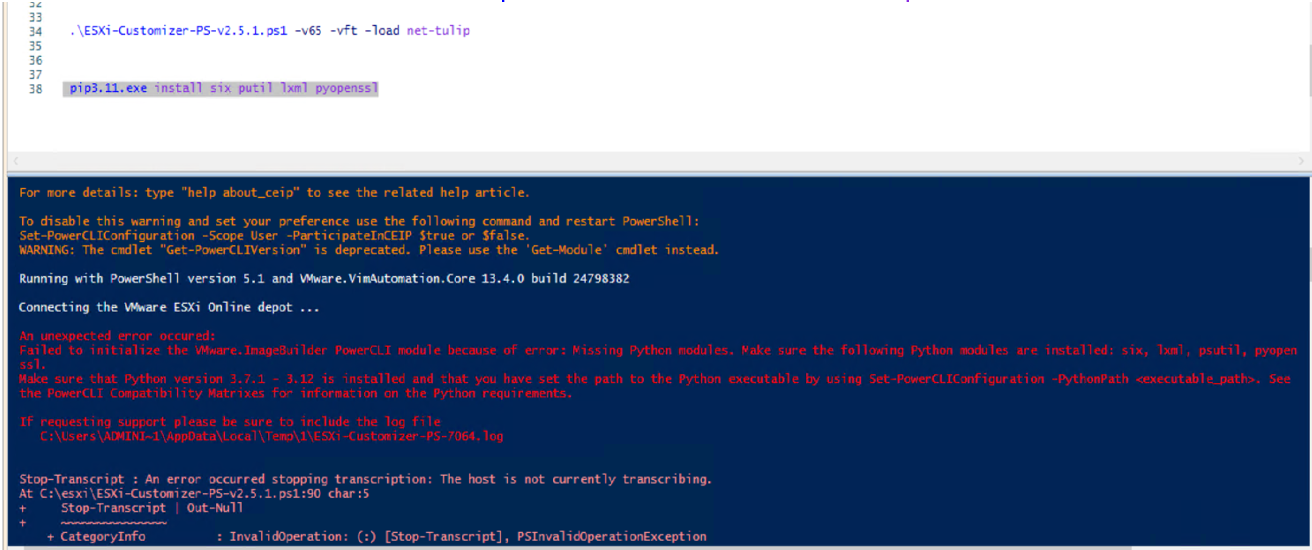
####ERROR MESSAGE####
An unexpected error occured:
Failed to initialize the VMware.ImageBuilder PowerCLI module because of error: Missing Python modules. Make sure the following Python modules are installed: six, lxml, psutil, pyopen
ssl.
Make sure that Python version 3.7.1 - 3.12 is installed and that you have set the path to the Python executable by using Set-PowerCLIConfiguration -PythonPath <executable_path>. See
the PowerCLI Compatibility Matrixes for information on the Python requirements.

If requesting support please be sure to include the log file
   C:\Users\ADMINI~1\AppData\Local\Temp\1\ESXi-Customizer-PS-7064.log
####ERROR MESSAGE####
FIX:
pip3.11.exe install six putil lxml pyopenssl
→ Step 4: Install the required Python packages
With PowerCLI configured, you can now install the specific Python modules required by the ImageBuilder component.
In your Administrator PowerShell window, use pip, Python's package manager, to install the packages. The -Scope User ensures the packages are installed for the current user.
pip3.11.exe install six putil lxml pyopenssl
NOTE: On some systems, you may need to use pip3 instead:
pip3 install six psutil lxml pyopenssl
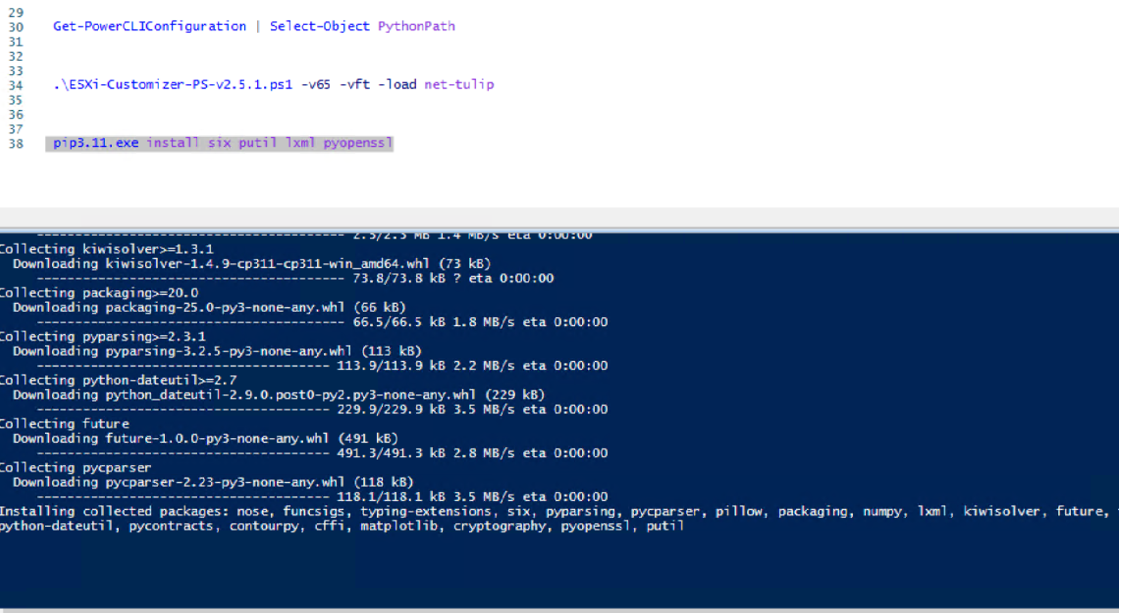
Output→
##OUTPUT####

Collecting pycparser
  Downloading pycparser-2.23-py3-none-any.whl (118 kB)
     -------------------------------------- 118.1/118.1 kB 3.5 MB/s eta 0:00:00
Installing collected packages: nose, funcsigs, typing-extensions, six, pyparsing, pycparser, pillow, packaging, numpy, lxml, kiwisolver, future, fonttools, decorator, cycler, scipy,
python-dateutil, pycontracts, contourpy, cffi, matplotlib, cryptography, pyopenssl, putil
pip3.11.exe :   DEPRECATION: pycontracts is being installed using the legacy 'setup.py install' method, because it does not have a 'pyproject.toml' and the 'wheel' package is not
installed. pip 23.1 will enforce this behaviour change. A possible replacement is to enable the '--use-pep517' option. Discussion can be found at
https://github.com/pypa/pip/issues/8559
At line:1 char:2
+  pip3.11.exe install six putil lxml pyopenssl
+  ~~~~~~~~~~~~~~~~~~~~~~~~~~~~~~~~~~~~~~~~~~~~
    + CategoryInfo          : NotSpecified: (  DEPRECATION: ...pip/issues/8559:String) [], RemoteException
    + FullyQualifiedErrorId : NativeCommandError

  Running setup.py install for pycontracts: started
  Running setup.py install for pycontracts: finished with status 'done'
Successfully installed cffi-2.0.0 contourpy-1.3.3 cryptography-46.0.2 cycler-0.12.1 decorator-5.2.1 fonttools-4.60.1 funcsigs-1.0.2 future-1.0.0 kiwisolver-1.4.9 lxml-6.0.2 matplotli
b-3.10.6 nose-1.3.7 numpy-2.3.3 packaging-25.0 pillow-11.3.0 putil-0.9.12 pycontracts-1.8.12 pycparser-2.23 pyopenssl-25.3.0 pyparsing-3.2.5 python-dateutil-2.9.0.post0 scipy-1.16.2
six-1.17.0 typing-extensions-4.15.0
[notice] A new release of pip available: 22.3 -> 25.2
[notice] To update, run: python.exe -m pip install --upgrade pip
Error:
to upgrade pip 22.3 -> 25.2:
pip install six lxml psutil pyopenssl --upgrade
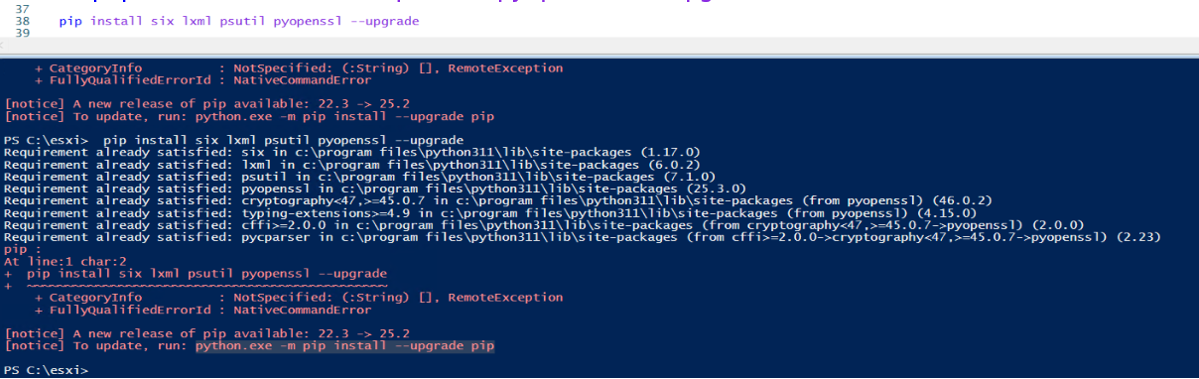
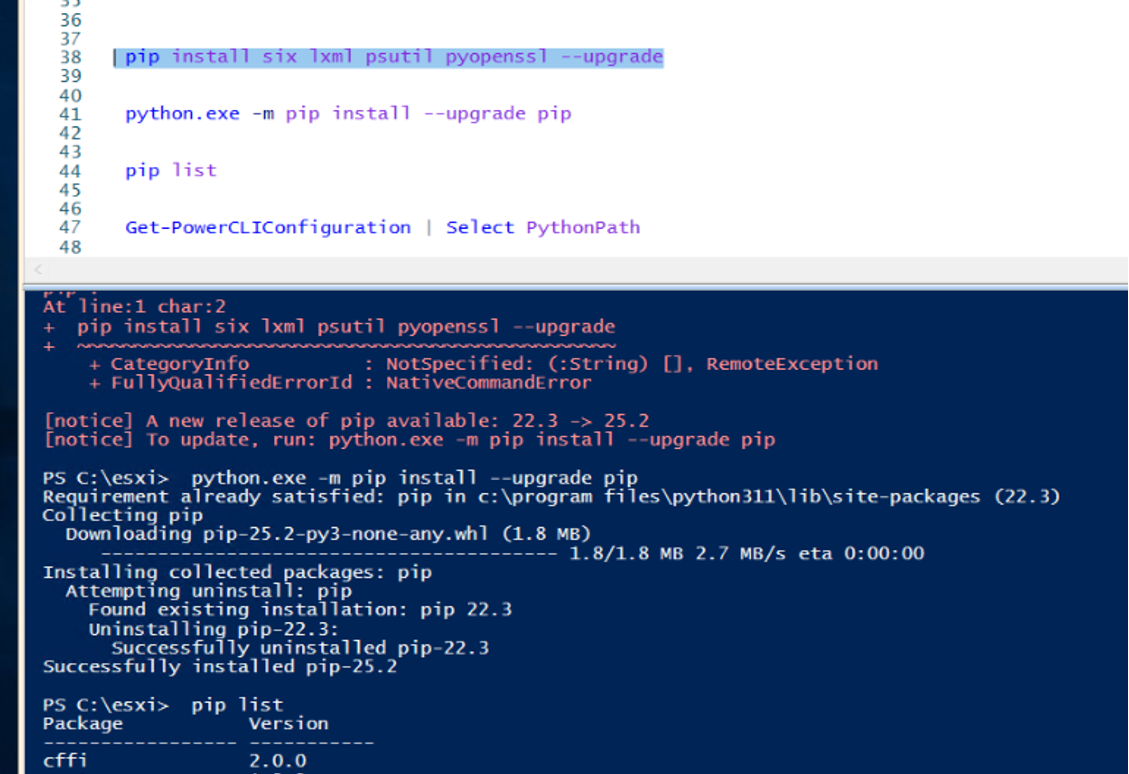
Output→
##OUTPUT####

PS C:\esxi>  pip install six lxml psutil pyopenssl --upgrade
Requirement already satisfied: six in c:\program files\python311\lib\site-packages (1.17.0)
Requirement already satisfied: lxml in c:\program files\python311\lib\site-packages (6.0.2)
Requirement already satisfied: psutil in c:\program files\python311\lib\site-packages (7.1.0)
Requirement already satisfied: pyopenssl in c:\program files\python311\lib\site-packages (25.3.0)
Requirement already satisfied: cryptography<47,>=45.0.7 in c:\program files\python311\lib\site-packages (from pyopenssl) (46.0.2)
Requirement already satisfied: typing-extensions>=4.9 in c:\program files\python311\lib\site-packages (from pyopenssl) (4.15.0)
Requirement already satisfied: cffi>=2.0.0 in c:\program files\python311\lib\site-packages (from cryptography<47,>=45.0.7->pyopenssl) (2.0.0)
Requirement already satisfied: pycparser in c:\program files\python311\lib\site-packages (from cffi>=2.0.0->cryptography<47,>=45.0.7->pyopenssl) (2.23)
pip :
At line:1 char:2
+  pip install six lxml psutil pyopenssl --upgrade
+  ~~~~~~~~~~~~~~~~~~~~~~~~~~~~~~~~~~~~~~~~~~~~~~~
    + CategoryInfo          : NotSpecified: (:String) [], RemoteException
    + FullyQualifiedErrorId : NativeCommandError

[notice] A new release of pip available: 22.3 -> 25.2
[notice] To update, run: python.exe -m pip install --upgrade pip
Pushed me to upgrade pip.
NOTE:
✅ Yes, it’s absolutely safe to upgrade pip — it will not impact your ESXi-Customizer-PS or PowerCLI workflow.
⚙️ Here’s Why
The ESXi-Customizer-PS script relies on:
VMware PowerCLI modules
Python interpreter (3.7–3.11)
VMware ImageBuilder backend
It does not depend on pip packages or Python’s package manager itself.
The psutil module you just installed is used internally by ImageBuilder and PowerCLI, and it’s already compatible with the version you installed.
Upgrading pip just updates the package installer logic, not Python runtime or existing packages.
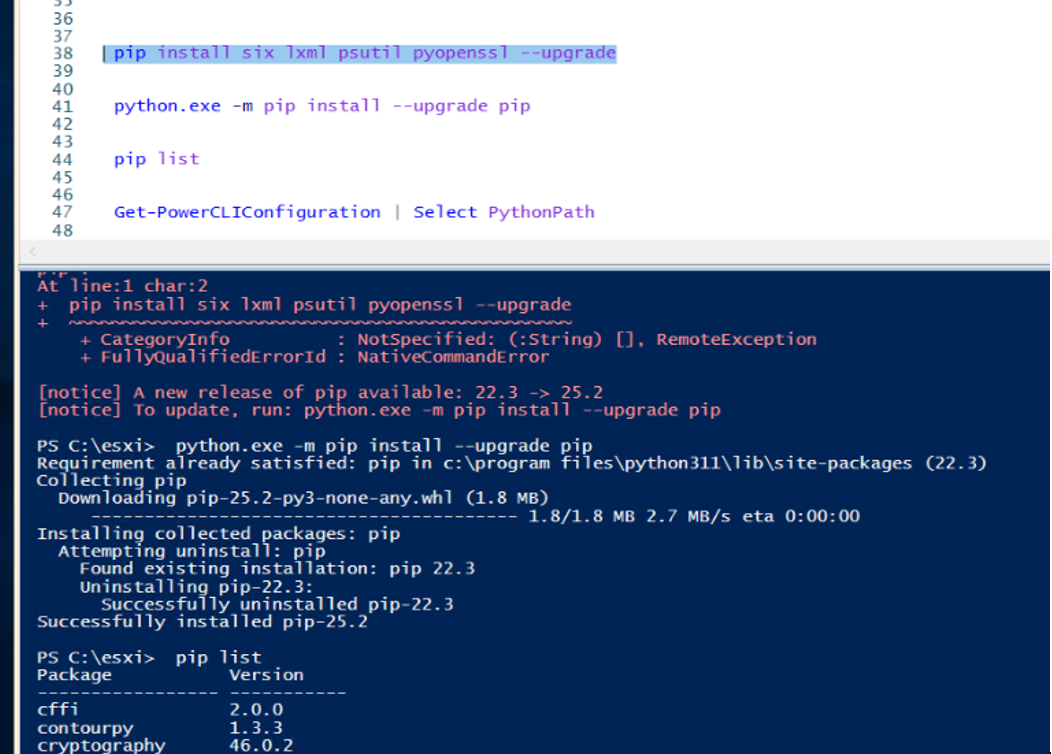
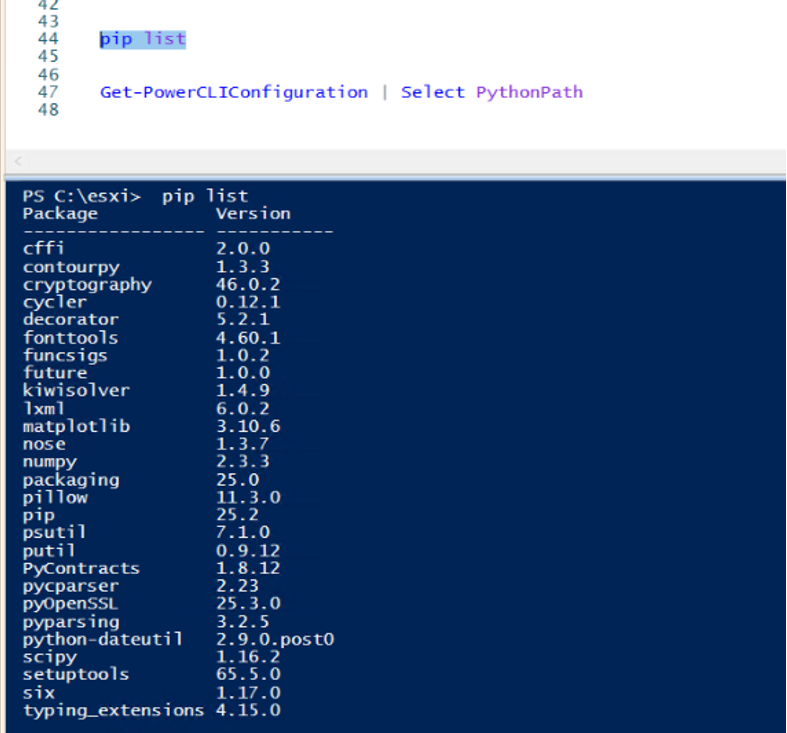
✅Once done, No PYTHON Error found.
Now Received Error related to internet/proxy settings block PowerShell’s web access, or VMware deprecated access for PowerCLI 13+ to that URL.
→ Step 5: Run ESXi-Customizer-PS
Download the script: Go to the ESXi-Customizer-PS page and download the script.
Unblock the script: Before running, you must unblock the downloaded .ps1 file. Right-click the file, go to Properties, and check the box next to Unblock. Click Apply and OK.
Run the command: With all dependencies in place, open PowerShell and navigate to the directory where you saved
ESXi-Customizer-PS-v2.5.1.ps1. Run your command.
.\ESXi-Customizer-PS-v2.5.1.ps1 -v65 -vft -load net-tulip
Error:
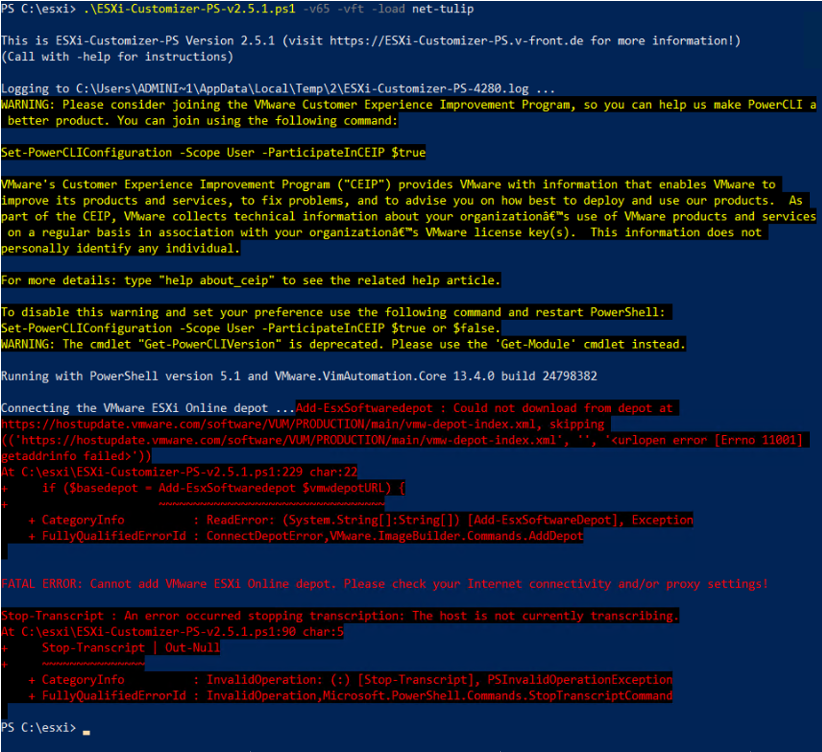
FIX:
Set-PowerCLIConfiguration -Scope User -ParticipateInCEIP $false
Error:
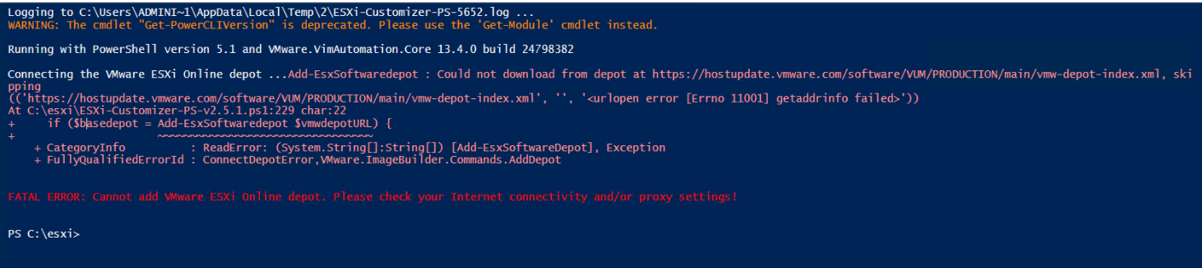
Possible FIX:
we’ll patch it so it no longer fails with:
“FATAL ERROR: Cannot add VMware ESXi Online depot. Please check your Internet connectivity and/or proxy settings!”
This happens because the script is hard-coded to use the online depot (https://hostupdate.vmware.com/software/VUM/PRODUCTION/main/vmw-depot-index.xml), which no longer works from modern PowerCLI builds or restricted networks.
We’ll fix that permanently by:
Making the script use TLS 1.2
Making it automatically switch to offline mode if the online depot fails.
Add this TLS + offline fallback block
Paste the following at the very top of the script (just below the copyright header):
# --- BEGIN PATCH: Force TLS 1.2 for modern PowerCLI ---
try {
    [Net.ServicePointManager]::SecurityProtocol = [Net.SecurityProtocolType]::Tls12
} catch { Write-Host "TLS 1.2 already enforced." -ForegroundColor Yellow }
# --- END PATCH ---

# --- BEGIN PATCH: Auto-fallback to offline bundle if online depot fails ---
$LocalDepotPath = "C:\esxi\VMware-ESXi-6.5.0-Update3-Offline-Bundle.zip"
if (!(Test-Path $LocalDepotPath)) {
    Write-Host "Offline depot not found at $LocalDepotPath — will try online first..." -ForegroundColor Yellow
}
# --- END PATCH ---
Follow-up Error:
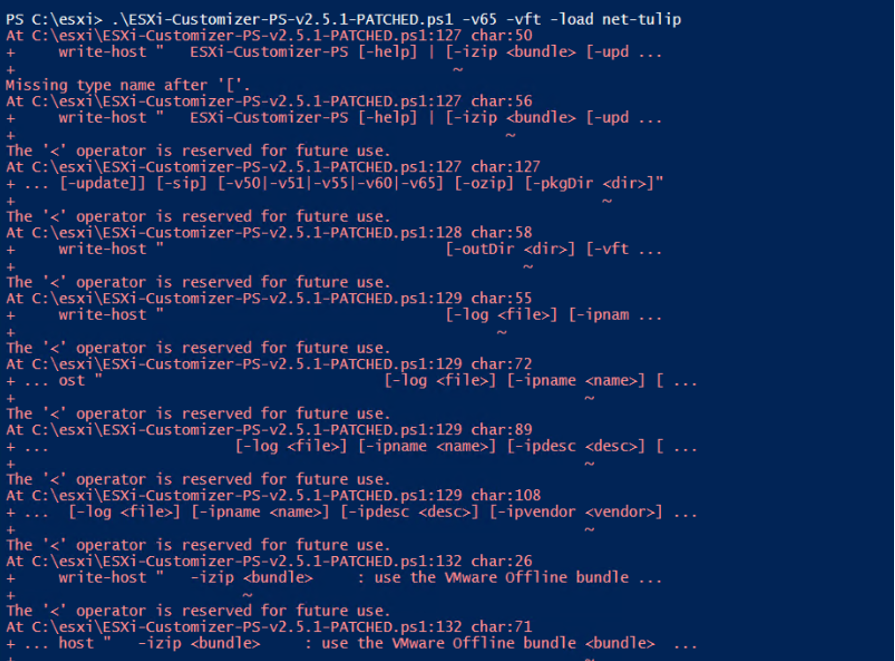
Possible FIX:
Here’s the issue:
In PowerShell 5.1, strings that contain < and > inside double quotes can trigger parsing if the string isn’t correctly escaped, especially if line breaks or pipes (|) appear inside them.
✅ The clean and permanent fix
We’ll wrap every help line in single quotes '...' instead of double quotes "..."
This completely disables parsing inside the string (so <, >, [, ], and | are treated as text).
###Inside ESXi-Customizer-PS-v2.5.1-PATCHED.ps1###
if ($help) {
    Write-Host ''
    Write-Host 'Usage:'
    Write-Host '   ESXi-Customizer-PS [-help] | [-izip <bundle> [-update]] [-sip] [-v50|-v51|-v55|-v60|-v65] [-ozip] [-pkgDir <dir>]'
    Write-Host '                                [-outDir <dir>] [-vft] [-dpt depot1[,...]] [-load vib1[,...]] [-remove vib1[,...]]'
    Write-Host '                                [-log <file>] [-ipname <name>] [-ipdesc <desc>] [-ipvendor <vendor>] [-nsc] [-test]'
    Write-Host ''
    Write-Host 'Optional parameters:'
    Write-Host '   -help              : display this help'
    Write-Host '   -izip <bundle>     : use the VMware Offline bundle <bundle> as input instead of the Online depot'
    Write-Host '   -update            : only with -izip, updates a local bundle with an ESXi patch from the VMware Online depot,'
    Write-Host '                        combine this with the matching ESXi version selection switch'
    Write-Host '   -pkgDir <dir>      : local directory of Offline bundles and/or VIB files to add (if any, no default)'
    Write-Host '   -ozip              : output an Offline bundle instead of an installation ISO'
    Write-Host '   -outDir <dir>      : directory to store the customized ISO or Offline bundle (default = script directory)'
    Write-Host '   -vft               : connect the V-Front Online depot'
    Write-Host '   -dpt depot1[,...]  : connect additional Online depots by URL or local Offline bundles by file name'
    Write-Host '   -load vib1[,...]   : load additional packages from connected depots or Offline bundles'
    Write-Host '   -remove vib1[,...] : remove named VIB packages from the custom Imageprofile'
    Write-Host '   -sip               : select an Imageprofile from the current list (default = auto-select latest available standard profile)'
    Write-Host '   -v50 | -v51 | -v55 | -v60 | -v65 : Use only ESXi 5.0/5.1/5.5/6.0/6.5 Imageprofiles as input, ignore other versions'
    Write-Host '   -nsc               : use -NoSignatureCheck with export'
    Write-Host '   -log <file>        : use custom log file <file>'
    Write-Host '   -ipname <name>     : provide custom name for the image'
    Write-Host '   -ipdesc <desc>     : provide custom description'
    Write-Host '   -ipvendor <vendor> : provide custom vendor for the image'
    Write-Host '   -test              : skip package download and image build (for testing)'
    Write-Host ''
    exit
}
###Inside ESXi-Customizer-PS-v2.5.1-PATCHED.ps1###
Follow-up Error:
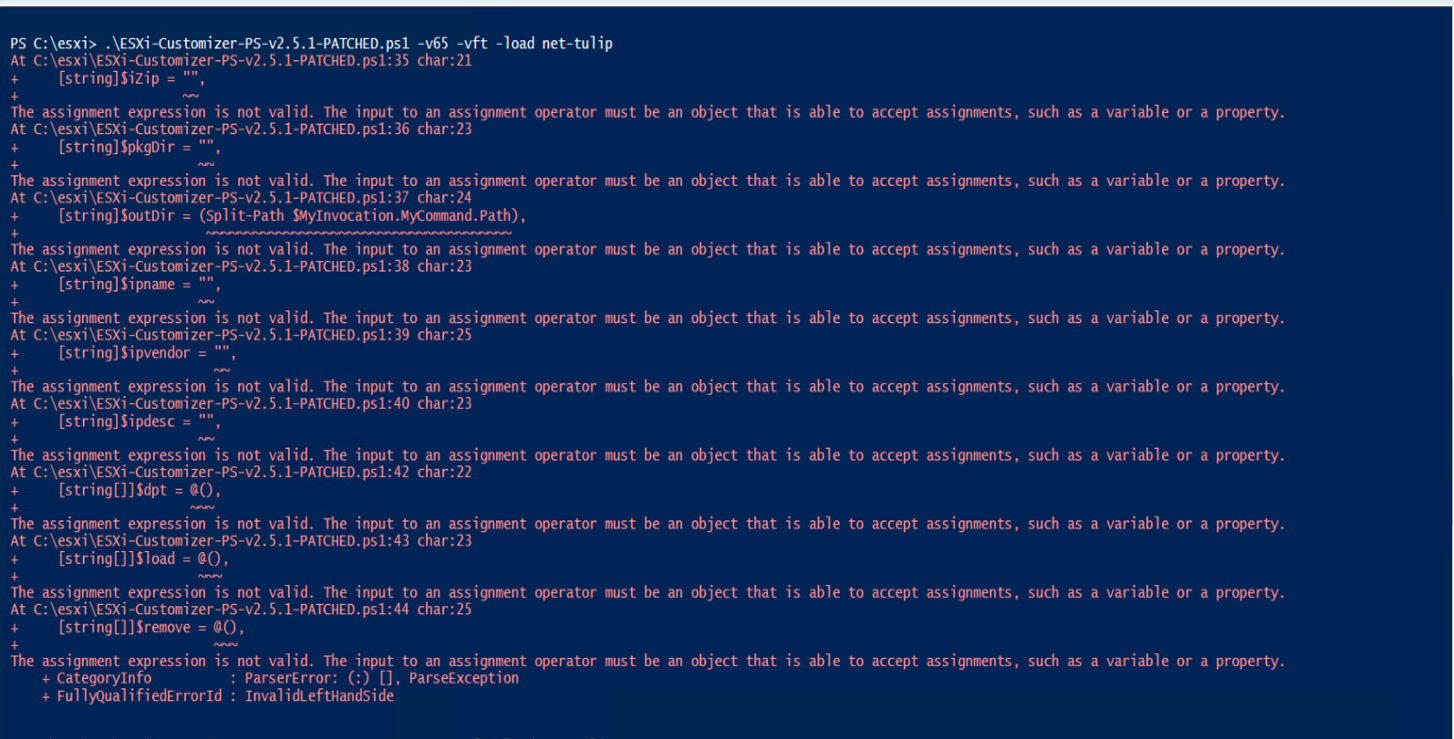
Possible FIX:
param() must be the very first executable statement in a script (except for a comment block). You had active code (your TLS/offline patches) before param, so PowerShell treated the param lines as assignment expressions and threw all those The assignment expression is not valid errors.
Ensure ‘>’ & ‘<’ at the start & end of the comments used & placed at very top of the script.
<#
some header comment
#>
In this case,
<# --- END PATCH ---

#############################################################################################################################
#
# ESXi-Customizer-PS.ps1 - a script to build a customized ESXi installation ISO using ImageBuilder
#
# Version:       2.5.1
# Author:        Andreas Peetz (ESXi-Customizer-PS@v-front.de)
# Info/Tutorial: https://esxi-customizer-ps.v-front.de/
#
# License:
#
# This program is free software: you can redistribute it and/or modify it under the terms of the GNU General Public License
# as published by the Free Software Foundation, either version 3 of the License, or (at your option) any later version.
#
# This program is distributed in the hope that it will be useful, but WITHOUT ANY WARRANTY; without even the implied warranty
# of MERCHANTABILITY or FITNESS FOR A PARTICULAR PURPOSE. See the GNU General Public License for more details.
#
# A copy of the GNU General Public License is available at http://www.gnu.org/licenses/.
#
#############################################################################################################################>

param(
    [string]$iZip = "",
    [string]$pkgDir = "",
    [string]$outDir = $(Split-Path $MyInvocation.MyCommand.Path),
    [string]$ipname = "",
    [string]$ipvendor = "",
    [string]$ipdesc = "",
    [switch]$vft = $false,
    [string[]]$dpt = @(),
    [string[]]$load = @(),
    [string[]]$remove = @(),
    [switch]$test = $false,
    [switch]$sip = $false,
    [switch]$nsc = $false,
    [switch]$help = $false,
    [switch]$ozip = $false,
    [switch]$v50 = $false,
    [switch]$v51 = $false,
    [switch]$v55 = $false,
    [switch]$v60 = $false,
    [switch]$v65 = $false,
    [switch]$update = $false,
    [string]$log = ($env:TEMP + "\ESXi-Customizer-PS-" + $PID + ".log")
)

# --- BEGIN PATCH: Force TLS 1.2 for modern PowerCLI ---
try {
    [Net.ServicePointManager]::SecurityProtocol = [Net.SecurityProtocolType]::Tls12
} catch { Write-Host "TLS 1.2 already enforced." -ForegroundColor Yellow }
# --- END PATCH ---
Follow-up Error:
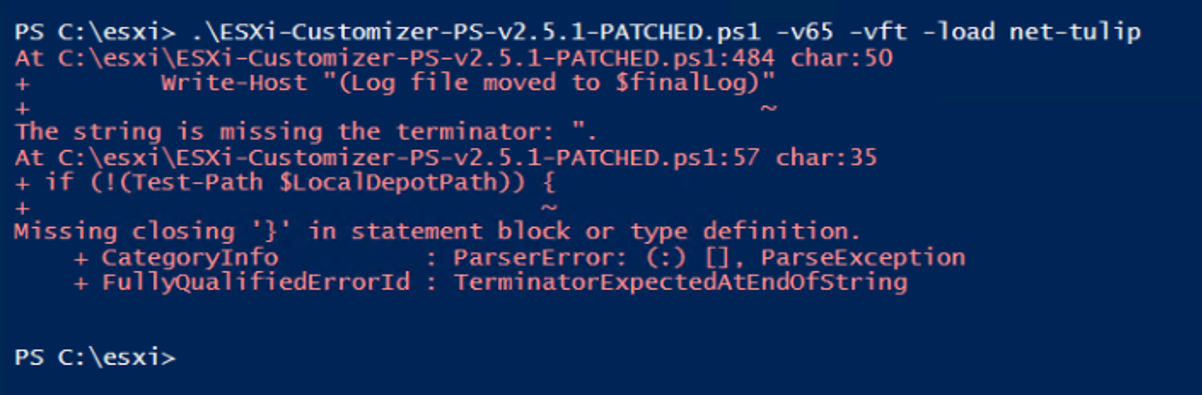
Later, the error continued to appear and seemed unnecessary. After searching online, I discovered that creating custom ISOs for ESXi-7.x.x versions and earlier in this way is now outdated. Although I didn't achieve the desired outcome and faced some frustrating obstacles, I learned the core concepts. This knowledge will help me prepare for the next step: creating a custom ISO for ESXi-8.x.x using PowerCLI, where the Customizer-PS tool is no longer needed.
CONCLUSION
In conclusion, this experiment with setting up VMware ESXi using nested virtualization on Hyper-V provided a valuable learning experience, despite not achieving the desired outcome. The process involved understanding and configuring various components such as hardware verification, BIOS virtualization, and troubleshooting compatibility issues. The use of ESXi-Customizer-PS for older ESXi versions highlighted the challenges and solutions encountered. Although this method is now considered legacy and is being replaced by the more efficient "PowerCLI method" for ESXi 8, the hands-on exposure gained through this process is invaluable for understanding the complexities of virtualization across different platforms. This journey underscores the importance of adapting to evolving technologies and methodologies in the field of virtualization.
REFERENCES
About the author
- A passionate Senior System Administrator with a strong and evolving focus on DevOps practices. With extensive experience in server administration, infrastructure management, and advanced troubleshooting, I specialize in optimizing systems through automation, CI/CD pipelines, and performance tuning. Currently working with cloud platforms like AWS & Azure, virtualization technologies, and configuration management tools, I am committed to driving efficiency, scalability, and reliability across environments. Through this blog, I will be sharing hands-on insights, tutorials, and practical tips to help professionals grow in system administration and automation.
Comments
Join the discussionNo comments yet. Be the first to comment.
VMware Area⚡
This series is my tribute to VMware Technologies — ESXi, vCenter, vSAN, and Virtualization — dedicated to everything I learn, build, and automate in creating powerful virtual infrastructures!